

Pregunta:
¿Cómo se utiliza el flujo de trabajo de migración en DocuWare 7 y versiones posteriores?
Respuesta:
El flujo de trabajo de migración se puede utilizar para migrar datos de discos DocuWare a otros discos DocuWare dentro de un archivador.
Complete los siguientes pasos para utilizar correctamente un flujo de trabajo de migración;
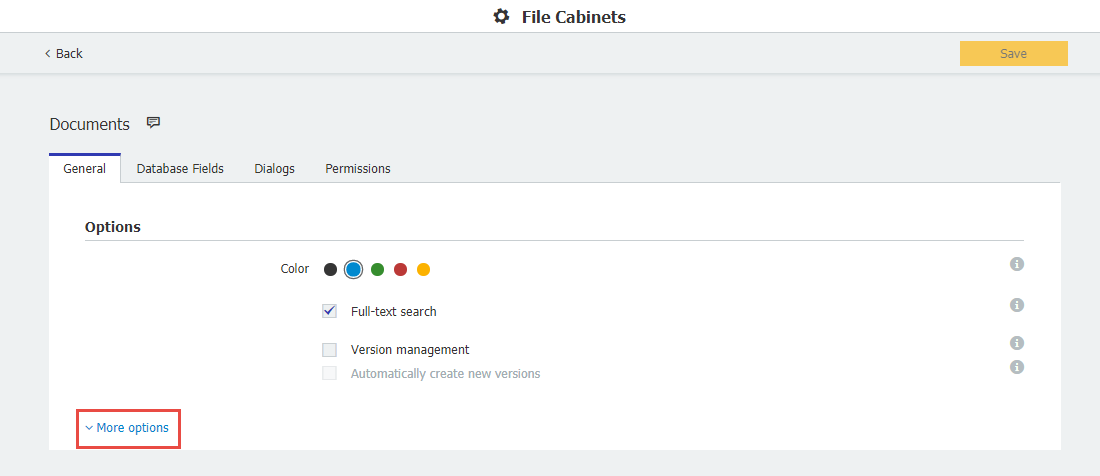
1. En primer lugar, debemos obtener el GUID del Archivador, que se encuentra en el plugin de Configuraciones del Archivador.
- Vaya a "Más opciones":
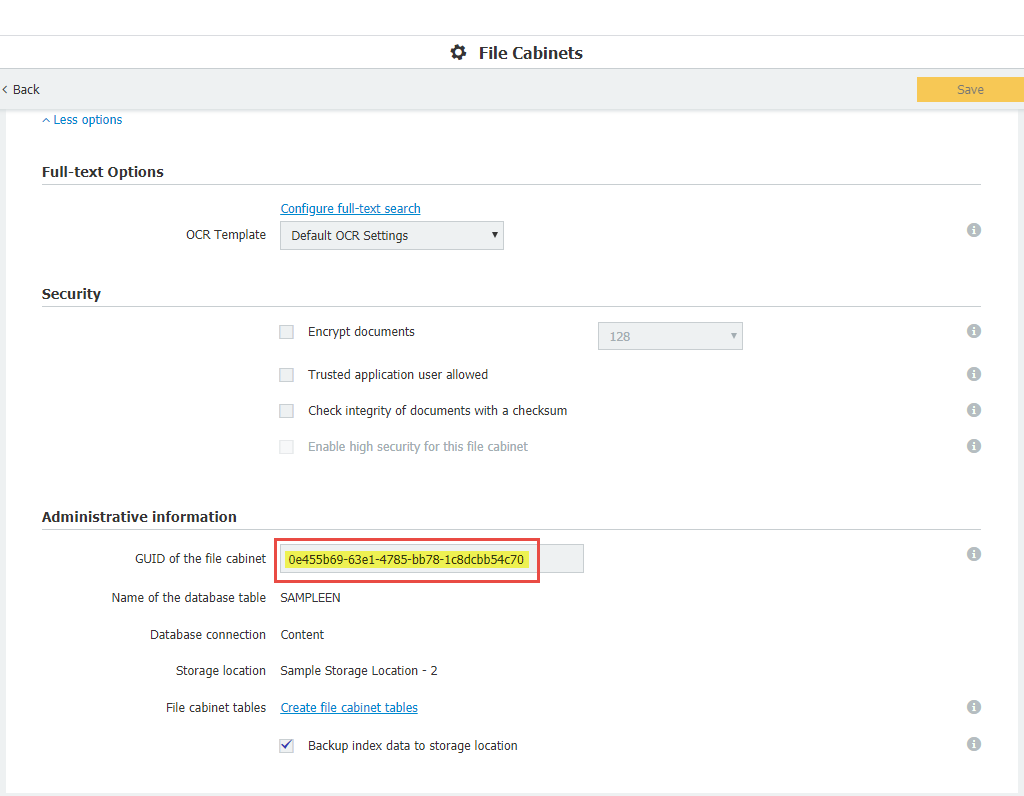
- El GUID del Archivador se puede encontrar aquí, copie esto en un bloc de notas, ya que se utilizará más adelante:
2. Deberá crearse un XML en la carpeta Background Process Service de la instalación de DocuWare. En este caso, se utilizará DocumentTool.SampleMigrationSettings.xml como nombre del archivo XML.
3. Abra el XML en el bloc de notas, copie el archivo en el bloc de notas, ya que se utilizará más adelante. Abra el XML en el bloc de notas, en el XML estará lo siguiente:
<BatchDocumentSettings fileCabinetGuid="e3dcc667-3bb3-46fd-9b23-395bd28a0f52" destinationDiskNumber="1">
<DocumentsFilter fromStorageDateTime="2017-06-12T05:54:27" toStorageDateTime="2018-06-12T05:54:27" fromModificationDateTime="2017-06-12T05:54:27" toModificationDateTime="2018-06-12T05:54:27" fromDocID="0" toDocID="1500">
<DiskNumbers>
<System.Int32>2</System.Int32>
<System.Int32>3</System.Int32>
</DiskNumbers>
</DocumentsFilter>
</BatchDocumentSettings>
Nota: Dado este archivo de ajustes, el trabajo migrará todos los documentos que estén en los números de disco 2 y 3, tengan fecha de modificación entre 2017-06-12T05:54:27 y 2018-06-12T05:54:27, fecha de almacenamiento entre 2017-06-12T05:54:27 y 2018-06-12T05:54:27, y docId entre 0 y 1500.Estos documentos se moverán al disco número 1.
4. El GUID del archivador tendrá que ser reemplazado, así como el número de disco de destino. Configure los filtros como desee y ajuste los números de disco en consecuencia. En este caso, sólo los números de disco van a ser mantenidos y alterados con el fin de migrar el contenido del disco número 2 al disco número 1.
<BatchDocumentSettings fileCabinetGuid="0e455b69-63e1-4785-bb78-1c88dcbb54c70" destinationDiskNumber="1">
<DocumentsFilter>
<DiskNumbers>
<System.Int32>2</System.Int32>
</DiskNumbers>
</DocumentsFilter>
</BatchDocumentSettings>
5. Configuración de los documentos por lotes Una vez ajustado todo a su gusto, guarde y cierre el XML.
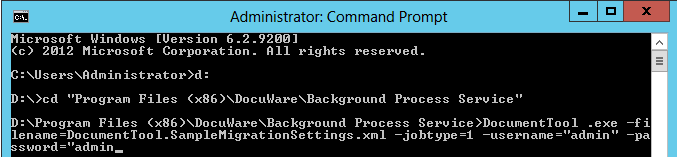
6. Para iniciar el flujo de trabajo de migración, vaya a la carpeta donde está instalado Background Process Service e introduzca el siguiente comando:
DocumentTool.exe -filename=DocumentTool.SampleMigrationSettings.xml -jobtype=1 -username="admin" -password="admin".
***Ajuste el nombre de archivo, el nombre de usuario de DocuWare y la Contraseña en consecuencia.***
A continuación se muestra un ejemplo del flujo de trabajo de migración en ejecución:
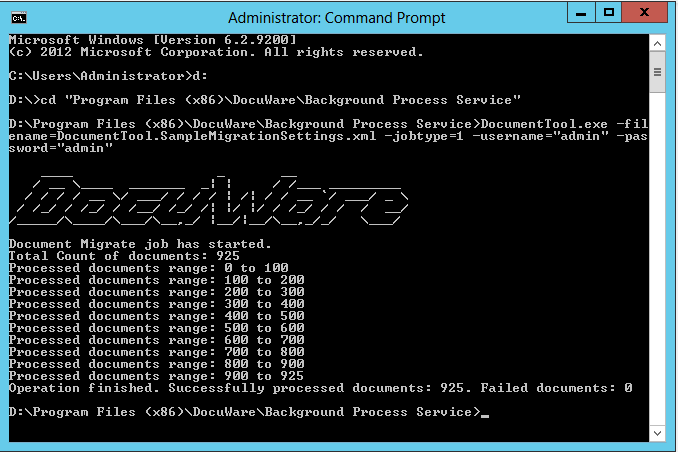
El proceso de migración ha finalizado. El contenido del disco número 2 se ha trasladado correctamente al disco número 1.
Tenga en cuenta: Este artículo es una traducción del idioma inglés. La información contenida en este artículo se basa en la(s) versión(es) original(es) del producto(s) en inglés. Puede haber errores menores, como en la gramática utilizada en la versión traducida de nuestros artículos. Si bien no podemos garantizar la exactitud completa de la traducción, en la mayoría de los casos, encontrará que es lo suficientemente informativa. En caso de duda, vuelva a la versión en inglés de este artículo.
KBA aplicable SÓLO para Organizaciones In situ.